
How to connect a BUKNUWO LiFePO4 battery to a solar system?
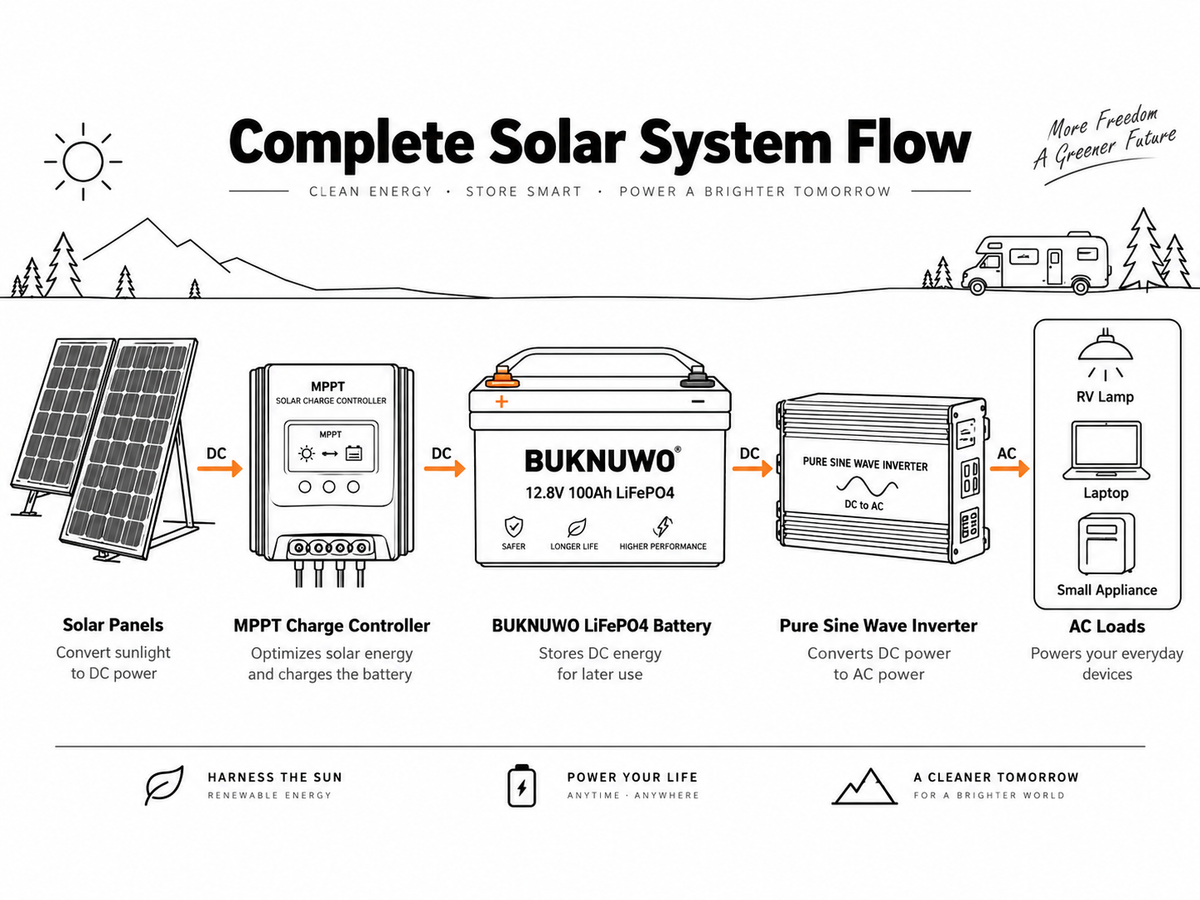
A solar setup for an RV, off-grid cabin, or backup power system needs more than panels and a battery. The charge controller, inverter, cables, and protection devices all have to work with the battery you choose.
Solar panels normally charge a LiFePO4 battery through a compatible solar charge controller. The battery then supplies the inverter, which powers your AC loads. This guide walks through that arrangement, including the ratings to check before making connections.
Start with the equipment and voltage
For this setup, you will need solar panels, a BUKNUWO LiFePO4 battery, an MPPT charge controller, and a pure sine wave inverter. You will also need suitable DC fuses or circuit breakers, PV and battery cables, and a disconnect switch. Larger systems may use busbars.
The battery, inverter, and MPPT controller must support the same battery-system voltage. These are the usual inverter voltage classes:
|
Battery system |
Inverter voltage class |
|
12.8V LiFePO4 |
12V inverter |
|
25.6V LiFePO4 |
24V inverter |
|
51.2V LiFePO4 |
48V inverter |
Check each device's actual input-voltage range as well as its label. Avoid mixing incompatible batteries when building a bank.

Choose the MPPT for the panels and battery
A battery's amp-hour capacity alone does not tell you which controller to buy. Check the array's total wattage, open-circuit voltage (Voc), and current, then the battery voltage and maximum charging current.
For a quick estimate of controller output current, use:
MPPT output current ≈ Solar panel watts ÷ Battery voltage
For example, 400W ÷ 12.8V ≈ 31A.
That estimate is only part of the selection. The panel arrangement must also stay within the controller's PV voltage and current limits. Connecting panels in series increases PV voltage; connecting them in parallel increases PV current.

Connect the battery side
Follow the connection instructions for your particular equipment. Many standalone MPPT controllers need the battery connected before the solar array so they can detect the system voltage.
Battery to MPPT
Use appropriately sized battery cables for these connections:
· Battery positive (+) through a suitable fuse or breaker to MPPT BAT+.
· Battery negative (-) to MPPT BAT-.
With the battery connected, verify its voltage and the MPPT settings, including the correct LiFePO4 charging profile.
Battery to inverter
The inverter has its own battery connections:
· Battery positive (+) through a suitable fuse or breaker to inverter positive (+).
· Battery negative (-) to inverter negative (-).
Choose the inverter by checking battery voltage, BMS continuous discharge current, load power, startup surge, and cable size. Battery capacity in Ah is not enough to establish whether the battery can supply the inverter's load.
Connect the solar array
The panels connect to the MPPT's PV terminals:
· Solar positive (+) through a suitable PV breaker to MPPT PV+.
· Solar negative (-) to MPPT PV-.
Before enabling the PV input, check polarity, array Voc against the controller's limit, the LiFePO4 charging profile, cable size, and fuse or breaker protection. Do not normally connect the panels directly to the battery; use a compatible MPPT or other solar charge controller between them.

Bring the system online in order
For many standalone-controller setups, the following sequence is appropriate. The manufacturers' instructions take priority if they specify a different order.
1. Connect the battery to the MPPT.
2. Verify battery voltage and MPPT settings.
3. Enable the battery-to-inverter circuit.
4. Connect or enable the solar array at the MPPT.
5. Turn on the inverter.
6. Turn on the AC loads.
A pure sine wave inverter is usually preferred for RVs, off-grid use, and sensitive electronics. Fixed AC wiring and grounding must follow local electrical codes.
Size the array for the energy you use each day
A 12.8V 100Ah LiFePO4 battery stores approximately 1,280Wh of nominal energy. The number of panels you need depends on how much energy you want to replace each day, the available sunlight, and panel wattage.
A planning estimate is:
Solar array watts ≈ Daily energy use ÷ Peak sun hours ÷ System efficiency
For 1000Wh of daily use, five peak sun hours, and 80% system efficiency:
1000 ÷ 5 ÷ 0.8 ≈ 250W
Extra solar capacity can help account for weather and system losses in actual use. This calculation estimates array size; it does not replace the earlier checks on MPPT voltage, current, or the battery's charging limit.

Check the whole installation before using it
An incorrectly sized component can affect the rest of the system. Review the battery voltage, MPPT rating, inverter load, BMS current limit, cable sizes, and protection devices together.
Pay particular attention to reversed polarity, excessive PV voltage, an incorrect charging profile, and undersized cables. Confirm that the installation has suitable fuses or breakers and that the planned inverter load is within the battery's capabilities. These checks matter just as much as connecting each cable to the correct terminal.
DISCOUNT CODE: BUKPOWER5
BUKNUWO 12.8V 314AH BULETOOTH BATTERY